How to configure rolling logs with Spring Boot in application.yml

I’m relatively new to Spring Boot, but I find the application.yml configuration pretty nice. But if you want to get fancy with spring boot logging, you have to resort to creating a logback file! Well I came up with this pattern to at least keep as much of the values as I can in application.yml.

First you do still need to add a logback-spring.xml

1
2
3
4
5
6
7
8
9
10
11
12
13
14
15
16
17
18
19
20
21
22
23
24
25
26
27
28
29
30
<?xml version="1.0" encoding="UTF-8"?>
<configuration>
	<include resource="org/springframework/boot/logging/logback/defaults.xml" />
	<appender name="FILE"
		class="ch.qos.logback.core.rolling.RollingFileAppender">
		<file>${LOG_PATH}/${LOG_FILE}.log</file>
		<rollingPolicy
			class="ch.qos.logback.core.rolling.SizeAndTimeBasedRollingPolicy">
			<!-- daily rollover -->
			<fileNamePattern>${LOG_PATH}/${LOG_FILE}.%d{yyyy-MM-dd}.%i.log</fileNamePattern>
			<!-- each file should be at most 100MB, keep 30 days worth of history, 
				but at most 500MB -->
			<maxFileSize>100MB</maxFileSize>
			<maxHistory>30</maxHistory>
			<totalSizeCap>500MB</totalSizeCap>
		</rollingPolicy>
		<encoder>
			<pattern>${FILE_LOG_PATTERN}</pattern>
		</encoder>
	</appender>
	<appender name="STDOUT" class="ch.qos.logback.core.ConsoleAppender">
		<encoder>
			<pattern>${CONSOLE_LOG_PATTERN}</pattern>
		</encoder>
	</appender>
	<root level="DEBUG">
		<appender-ref ref="STDOUT" />
		<appender-ref ref="FILE" />
	</root>
</configuration>

If you’re looking for a slightly different log rolling behavior, you can likely modify the above sample with the appender docs for ch.qos.logback.core.rolling.

And here is my application.yml. Note the use of classpath to keep the location of the config consistent.

1
2
3
4
5
6
logging:
  config: classpath:logback-spring.xml
  # Gets exposed as $LOG_FILE
  file: my_fancy_service
  # Gets exposed as $LOG_PATH
  path: .

Now in my application-production.yml I might have something like this:

1
2
3
logging:
  # Gets exposed as $LOG_PATH
  path: /var/log

This means in by default, logs will get put in ./my_fancy_service.log (and roll into my_fancy_service.2018-01-08.0.log and then my_fancy_service.2018-01-08.1.log etc as the log hits the maxFileSize). Assuming in production I’m using the application-production.yml profile, the log files will be the same but end up in /var/log. Keeping the configurations as close as possible between prod and dev means less surprises!

Posted in General | Tagged , , , , , | Leave a comment

Update /etc/hosts with DHCP reservations from dnsmasq on pi-hole

I recently decided to dust off one of my Raspberry Pi’s and put it into service as a DNS and DHCP server. Initially I was just going to setup dnsmasq myself, but I came across a cool project called pi-hole. Pi-hole installs dnsmasq and puts a nice web front end on everything. It also functions as a whole network ad-blocker which is nice bonus.

One problem I wanted to solve was how do I get DNS resolution of devices that I have setup with static IPs? I could hand edit /etc/hosts on the pi-hole… But my preference is to use the pi-hole UI and create DHCP reservations for those hosts. I wrote a tool to update /etc/hosts with the DHCP reservations from pi-hole’s dnsmasq. So now I have resolution that includes hosts that don’t have active leases with the server.

Check out my github repo for full details and installation instructions: https://github.com/npwolf/pi-hole-dhcp-to-hosts

Posted in General | Tagged , , , , , | Leave a comment

Apply Gmail label to message that contains string in body

Unfortunately gmail filters do not allow you to search just the body in a filter. IE body:myname is not valid. If your email address is first.last@some.com and you want to label all mail that contains First in the body, you cannot create a filter that works. You can however create a google apps script that will do it.

1. Go to https://script.google.com/, select Create script for Gmail.

2. Change label_name and name below then paste into google scripts.


1
2
3
4
5
6
7
8
9
10
11
12
13
14
15
16
17
18
19
20
21
22
23
function label_mention_in_body() {
  var label_name = 'YourLabel';
  var name = 'YourName';
  // I ignore name followed by . because 
  // my name is in my email address and I don't want that to count
  var regex = new RegExp(name + '[^.]', 'gi');
  // get all threads in inbox
  var threads = GmailApp.getInboxThreads();
  for (var i = 0; i < threads.length; i++) {
    // get all messages in a given thread
    var messages = threads[i].getMessages();
    // iterate over each message
    for (var j = 0; j < messages.length; j++) {
      var body = messages[j].getBody();
      if (body.match(regex)) {
        Logger.log("Adding label " + label_name + " to " + messages[j].getSubject() + " from " + messages[j].getTo());  
        var thread = messages[j].getThread();
        var label = GmailApp.getUserLabelByName(label_name);
        label.addToThread(thread);
      }
    }
  }
};

3. From the toolbar click Run -> label_mention_in_body

Assuming that did the right thing, you can now create a trigger to run this.

4. From the toolbar click Resources -> Current Project’s Triggers

5. Click add a new trigger. Change the drop downs to run every minute.

Done! It would be nice if you events could be OnNewMail or something, but this is better than nothing. I whipped this up pretty quick having never used google app scripts before. Pretty neat. Granted if this account had the ability for me to enable IMAP, I would have tried to set this sort of thing up with procmail.

Posted in General | Tagged , , | Leave a comment

Velocity 2013 Standout Presentations

Here are the presentations and people that stood out to me from Velocity 2013 conference. Definitely worth stalking all these folks. Great talks and ideas!

Facebook: Building A Billion User Load Balancer
Info: http://velocityconf.com/velocity2013/public/schedule/detail/28410

How To Run a Post-Mortem With Humans (Not Robots)
Info: http://velocityconf.com/velocity2013/public/schedule/detail/28251
Slides: http://www.slideshare.net/danmil30/how-to-run-a-postmortem-with-humans-not-robots-velocity-2013

The Secret of Safe, Continuous Deployment: Perceptual Diffs
Info: http://velocityconf.com/velocity2013/public/schedule/detail/28452
Tool + Video: https://dpxdt-test.appspot.com/

Stop the Guessing: Performance Methodologies for Production Systems
Info: http://velocityconf.com/velocity2013/public/schedule/detail/28486
Slides: http://www.slideshare.net/brendangregg/velocity-stoptheguessing2013

Application Resilience Engineering and Operations at Netflix
Info: http://velocityconf.com/velocity2013/public/schedule/detail/28267
Slides: https://speakerdeck.com/benjchristensen/application-resilience-engineering-and-operations-at-netflix

Quantifying Abnormal Behavior
Blog: https://vividcortex.com/blog/author/baron/
Info: http://velocityconf.com/velocity2013/public/schedule/detail/28118

Bring the Noise: Making Effective Use of a Quarter Million Metrics
Info: http://velocityconf.com/velocity2013/public/schedule/detail/28177
Video of what appears to be same presentation: http://vimeo.com/64659016

Posted in General | Tagged , | Leave a comment

Deploy Status Box using Raspberry Pi, LEDs, and Erlang

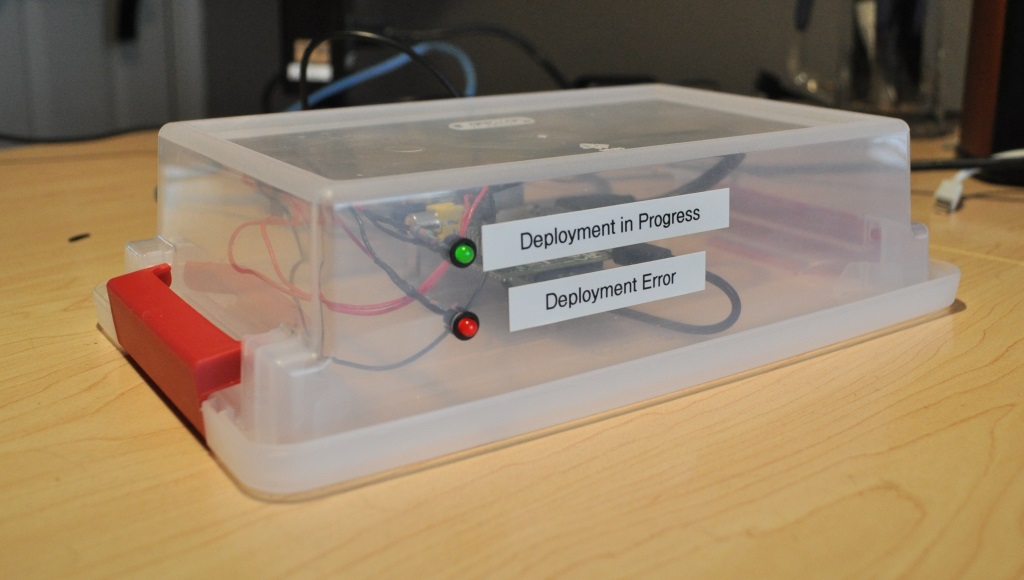
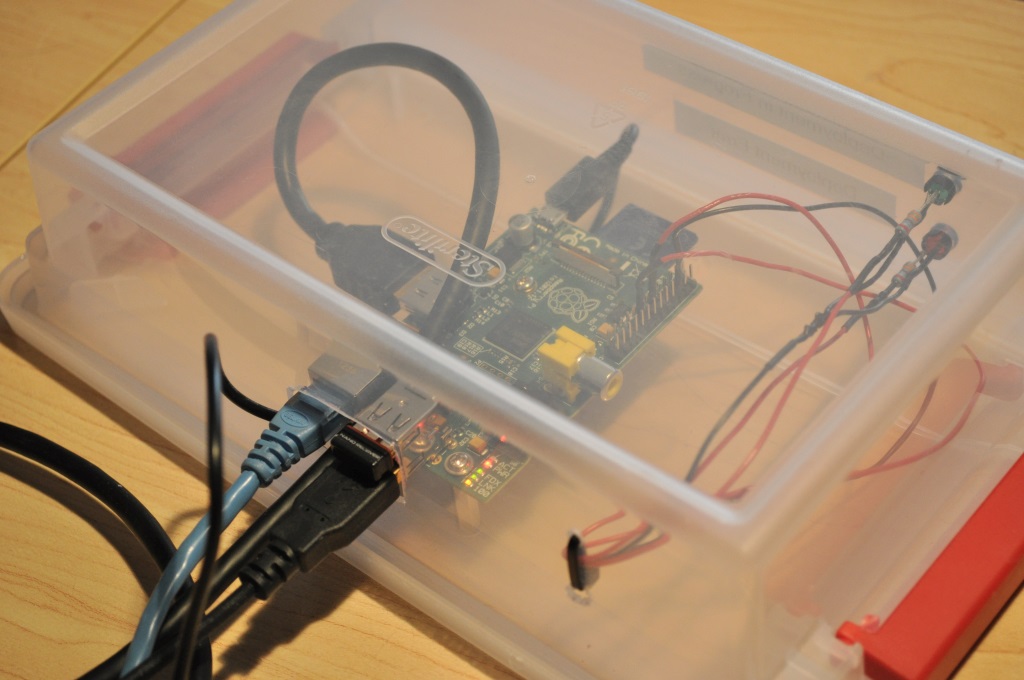
Over the weekend I decided to put together a small project using a Rasbperry Pi. One way of monitoring deployments at my company is IRC. I thought it would be neat to put together a Raspberry Pi to run erlbot and a plugin to toggle a couple LEDs to tell me when a deployment is in progress and when there was a problem with the deployment. (Note problem does not mean downtime, it just means a potential rollback or unexpected behavior during deployment which is transparent to our users). Here is the result:

pi_deploy (5)

pi_deploy (1)

pi_deploy (4)

pi_deploy (2)

There is a ton of helpful information out there on the Raspberry Pi. Here are a few links I found useful:

Beginner’s Guide to Raspberry Pi
LED tutorials: 1, 2, 3
GPIO Pins
Ten More Awesome Projects for your Raspberry Pi

I couldn’t find any Erlang modules for the Raspberry Pi to control LEDs on the Raspberry Pi, but I did find this post which pointed out you just write 1 or 0 to a file to toggle the LED. This is the basis of the led_controller.erl I wrote. You need to be root to write do anything with these files, but I wanted to run my Erlang script as a non-privileged user. Here is what to do if you want to control the LEDs while running as a normal user.

At your shell:

1
2
3
4
# Add user group gpio
sudo addgroup gpio
# Put pi user in group
usermod -a -G gpio pi

Next we update rc.local so we set our pins to work as outputs on boot and give the pi user the proper access. Note I’m using GPIO pins 17 and 22. Replace those numbers with whatever pins you use. Put this in /etc/rc.local before exit 0:

20
21
22
23
24
25
26
27
28
29
30
31
32
33
34
35
# Use pin gpio17 as output
echo 17 &gt; /sys/class/gpio/export
echo out &gt; /sys/class/gpio/gpio17/direction
# Allow users in gpio group to toggle pins
chgrp gpio /sys/class/gpio/gpio17/value
chmod g+w /sys/class/gpio/gpio17/value
 
# Use pin gpio17 as output
echo 22 &gt; /sys/class/gpio/export
echo out &gt; /sys/class/gpio/gpio22/direction
# Allow users in gpio group to toggle pins
chgrp gpio /sys/class/gpio/gpio22/value
chmod g+w /sys/class/gpio/gpio22/value
 
# This was there already
exit 0

You’ll need to run those lines as root or reboot before it will work.  If you have your LEDs wired up and you’ve run the above, you can verify it works:

# Turn LED on pin 17 on!
echo 1 > /sys/class/gpio/gpio17/value
# Turn it off!
echo 0 > /sys/class/gpio/gpio17/value

Finally if you want to toggle or blink LEDs in Erlang, here is the led_controller.erl I wrote.

You can try it at the erl shell:

% Compile module
c(led_controller).
% Start led controller module (My Red LED is on pin 22, Green on 17)
led_controller:start_link([{red, 22}, {green, 17}]).
% Turn on the green led
led_controller:on(green).
% Blink the green led 10 times. When done it returns to previous state, on
led_controller:blink(green, 10).
% Blink the red led 5 times. When done it returns to previous state, off
led_controller:blink(green, 5).
Posted in General | Tagged , , | Leave a comment

erlbot: The Erlang IRC Bot

I recently took a month long introductory course on Erlang. Erlang is a functional language. The closest I’ve come to functional programming is XSLT, so this was quite different for me. Erlang excels at concurrency and fault tolerance. It has made me think differently about how to solve problems which is always great. If you’re interested in Erlang, there is a great free tutorial Learn You Some Erlang

The project I decided to create to help me learn Erlang is an IRC bot. When I first went on the internet in 1995 or so, IRC was one of the first things I found and loved. My network of choice was EFnet. At the time, I recall it was somewhat lawless. People constantly warring over nicks and channels. People were always trying to flood each other off. It was a bit of an arms race. You ran scripts to protect yourself from other users. I bet one of the earliest uses of botnets was IRC. The original purpose was so you could steal a channel or keep one. Thanks to the internet, the world is a lot smaller now. IRC was one of the early technologies that helped regular people connect with each other across the world.

Like many organizations, the one I work for has offices all over the world. I’m on a team that has members in multiple locations. One old, but great way we keep connected is IRC. Different teams have different channels, but you’re free to watch or contribute to the conversation of any group. We use Google Hangouts to do our standups, but everyone I work with uses IRC for fast and easy communication throughout the day. Some people prefer to use an instant messenger client, but I always try to move those conversations to IRC. When you have conversations in a shared space, other people get a chance to listen in and contribute.

Erlbot is no HUBOT (yet). But it is a fun way to learn Erlang for me. I will be maintaining the bot at github: https://github.com/npwolf/erlbot

Features so far:
– Fault tolerance – Using Erlang’s supervisor behavior, an error in a plugin or part of the bot won’t bring the bot down
– Uptime – Erlang supports hot code loading and I’ve built the plugin system to allow the addition of plugins while running
– Extensibility – Plugins!
– Evangelize Plugin – erlbot will send a random fact to the channel when someone mentions Erlang

My one Erlang tip is Reloader from mochiweb. I added this to my erlbot source code and now the first thing I do when I launch the erl shell is reloader:start_link(). This will automatically reload beam files when they are recompiled (say using ./rebar compile).

Posted in General | Tagged , | Leave a comment

Running Django on Windows: Python 2.7.2 x64, PyISAPIe and IIS 7.5

Overview

Ok so I wanted to try serving Django from IIS 7.5 using Python 2.7.  The advice available says to install PyISAPIe.  Unfortunately there is not a compiled version of this available for Python 2.7 (x64 in my case).  geographika has a great post on compiling one yourself.  The following instructions are based on his guide, updated with newer versions.  If you don’t want/can’t compile it, here is my compiled version: PyISAPIe-trunk-r201-Py2.7.2×64.zip

Install Python

I did this on Win2k8 R2 Standard with VS2010.

I used ActiveState’s Python from http://www.activestate.com/activepython/downloads (Windows 64bit 2.7.2.5)

Install Python

Compile PyISAPIe

(or you can skip this and unzip PyISAPIe-trunk-r201-Py2.7.2×64.zip into c:\PyISAPIe (remove the PyISAPIe-trunk-r201-Py2.7.2×64 folder)

cd \temp

# If you want to duplicate what I’m doing exactly add -r 201 to get the revision I got

svn co http://pyisapie.svn.sourceforge.net/svnroot/pyisapie/Trunk pyisapi-trunk

robocopy c:\python27 pyisapi-trunk\Python\x64\Python27 /mir

open pisapi-trunk\PyISAPI.sln in VS2010

Change target to Release|x64

Right click PyISAPIe project, Properties, Configuration Properties->C/C++

Change Preprocessor PYI_PY_VERSION=PY_27 to PYI_PY_VERSION=PY_27_2

Open PyISAPIe.h and insert the following after #define PY_27

#define PY_27_2   (PY_27 + 2)

Compile!

I got a couple of IntelliSense errors, but you can safely ignore those.

PyISAPIe.dll is produced under pyisapi-trunk\x64\Release

mkdir c:\PyISAPIe

copy pyisapi-trunk\x64\Release\PyISAPIe.dll c:\PyISAPIe

# Case may be important here

robocopy pyisapi-trunk\PyISAPIe\Python\Http c:\PyISAPIe\Http

Configure Website

Edit the properties -> security settings of c:\pyisapie\PyISAPIe.dll, add “Network Service” and tick “read” permission. (So IIS can use it).

# This is where we’ll put our python web app

mkdir c:\inetpub\PyApp

copy pyisapi-trunk\PyISAPIe\Python\Examples\Info.py c:\inetpub\PyApp

Open IIS Manager

Create new site called PyApp, set physical path to c:\inetpub\PyApp, set port to 8090 (or whatever is unused)

Select PyApp, Handler Mappings->Open Feature

Click Add Script Map” with the following setting
Request Path = *
Executable = C:\PyISAPIe\PyISAPIe.dll
Name = PyISAPIe

Ok now browse http://localhost:8090/info.py and it should work!

Install Django

Download Django 1.3.1 from https://www.djangoproject.com/download/

Extract and run python setup.py install

cd c:\inetpub\PyApp

# Create test Django project

django-admin.py startproject djangotest

Stick the following in djangotest\helloworld.py

from django.http import HttpResponse
 
def index(request):
    return HttpResponse("Hello world!")

Replace djangotest\urls.py with:

from django.conf.urls.defaults import *
 
urlpatterns = patterns('',
    # Example:
    # (r'^newtest/', include('proj.apps.foo.urls.foo')),
    (r'^.*$', 'djangotest.helloworld.index'),
 
    # Uncomment this for admin:
#     (r'^admin/', include('django.contrib.admin.urls')),
)

python djangotest\manage.py runserver

now browse to http://127.0.0.1:8000/ to make sure the internal Django server serves the site ok

Before Django will work in IIS, you need just a couple more steps.

copy /y c:\PyISAPe\Examples\Django\*.py c:\PyISAPIe\Http

Now edit C:\PyISAPIe\Http\Isapi.py after ‘Import DjangoMap’ add:

import os
# Probably a better way to do this, but this will get us going!
os.sys.path.append(‘c:\inetpub\PyApp’)

then jump down a bit and replace the following:
[“/1” , “mysite1.settings” ], # first Django app
with
[“/djangotest” , “djangotest.settings” ], # first Django app

Ok now try browsing http://localhost:8090/djangotest (or whatever port you configured the site on). You should see “Hello World!”. As geographika noted, you will need to recycle the PyApp app pool if you change any files on disk. I may try his modifications on DjangoMap.py’s Request method to get immediate feedback.

That seemed to have done it. I’ll try to post an update after I’ve been using it a bit.

Very Helpful Links

Compiling a 64bit Version of PyISAPIe – http://geographika.co.uk/compiling-a-64-bit-version-of-pyisapie

Setting up Python on IIS7 – http://geographika.co.uk/setting-up-python-on-iis7

https://code.djangoproject.com/wiki/DjangoOnWindowsWithIISAndSQLServer

Django Tutorial – https://docs.djangoproject.com/en/dev/intro/tutorial01/

My Compiled PyISAPIe for Python 2.7.2 x64 – PyISAPIe-trunk-r201-Py2.7.2×64.zip

Posted in General | Tagged , , | 4 Comments

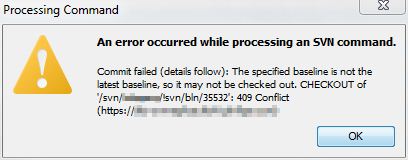
The specified baseline is not the latest baseline, so it may not be checked out. Checkout of ‘/svn/yourrepo/!svn/bln/123456’: 409 Conflict (https://svnserver.com)

Are you getting “The specified baseline is not the latest baseline, so it may not be checked out.  Checkout of ‘/svn/yourrepo/!svn/bln/123456’: 409 Conflict (https://svnserver.com)” when trying to commit to Subversion?  I’ve setup a Subversion write-through proxy to improve multi-site performance.  Unfortunately this seems to be one of the downsides.

The solution to the above is to update and try committing again.  It is possible you may need to wait until your write-through proxy has synced with the master before it will work.

Posted in General | Tagged | Leave a comment

PowerShell Log function with word wrapped output to the screen

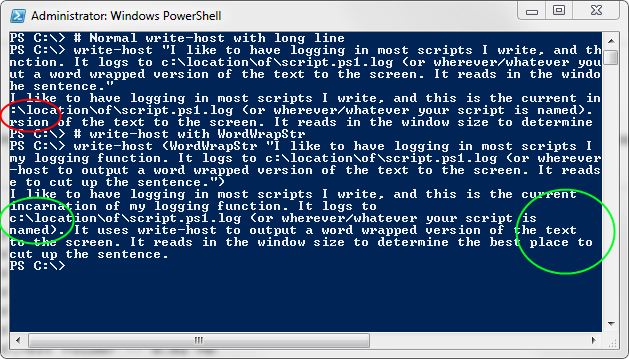
I like to have logging in most scripts I write, and this is the current incarnation of my logging function. It logs to c:\location\of\script.ps1.log (or wherever/whatever your script is named). It uses write-host to output a word wrapped version of the text to the screen. It reads in the window size to determine the best place to cut up the sentence.

# Name of the currently executing script
$ScriptName = $MyInvocation.MyCommand.Path 
# Simple log file name, OurScriptName.ps1.log
$LogFile = $ScriptName + ".log"
 
# Word wrap function, return word wrapped version of passed string
function WordWrapStr($str)
{
	# Holds the final version of $str with newlines
	$strWithNewLines = ""
	# current line, never contains more than screen width
	$curLine = ""
	# Loop over the words and write a line out just short of window size
	foreach ($word in $str.Split(" "))
	{
		# Lets see if adding a word makes our string longer then window width
		$checkLinePlusWord = $curLine + " " + $word
		if ($checkLinePlusWord.length -gt (get-host).ui.rawui.windowsize.width)
		{
			# With the new word we've gone over width
			# append newline before we append new word
			$strWithNewLines += [Environment]::Newline
			# Reset current line
			$curLine = ""
		}
		# Append word to current line and final str
		$curLine += $word + " "
		$strWithNewLines += $word + " "
	}
	# return our word wrapped string
	return $strWithNewLines
}
 
# Log function, append passed string to log file
function Log([string]$logline)
{
    $timestamp = Get-Date -f "yyyy-MM-dd HH:mm:ss"
    $StdLogLine = "$timestamp&gt; $logline"
	# Add the log line to our log file in ascii with timestamp
    Add-Content $LogFile $StdLogLine -encoding ascii
    # Print to the screen the word wrapped version (no timestamp)
	write-host (WordWrapStr $logline)
}
 
Log "This text will first be appended to $LogFile, ascii encoded.  Also cut up the text and print it out word wrapped to the screen.  It works even with really long lines."

Example with and without word wrapped write-host:

Posted in General | Tagged | Leave a comment

Batch file bootstrap PowerShell script for easy double click running

The scenario is you have a PowerShell script that takes no paramaters and prompts the user for all the information it needs. How do you make it extra simple for people to check it out of source control and run it?

You have 1 .bat or .cmd file in the root of the folder. Create a subfolder like internal and put all your ps1 files in there. Here is what I put together so you could just double click the .bat/.cmd file and have your PowerShell script execute without worry.

@echo off
setlocal
REM Check to see if Powershell is in path
for %%X in (powershell.exe) do (set FOUND=%%~$PATH:X)
if not defined FOUND (
	echo Please install PowerShell v2 or newer.
	pause
	exit /b 1
)

REM Check to see if we have powershell v2 or later
PowerShell.exe -command "& { if ($host.Version.Major -lt 2) { exit 1 } }"
if %ERRORLEVEL% EQU 1 (
	echo Please upgrade to PowerShell v2 or later.
	pause
	exit /b 1
)

REM Set scriptDir to directory the batch file is located
set scriptDir=%~dp0
echo Running powershell.exe %scriptDir%internal\MyScript.ps1
REM Note the RemoteSigned in case the system is defaulted to restricted
powershell.exe -ExecutionPolicy RemoteSigned -command "& { "%scriptDir%internal\MyScript.ps1"; exit $LastExitCode }"
if "%ERRORLEVEL%" NEQ "0" (
	echo There may have been a problem with MyScript.  Please read the above text carefully before exiting.
)
pause
endlocal

After replacing MyScript with the name of your script, stick the contents in MyScript.cmd in your main directory. Make sure you have your powershell script in a subdirectory called internal. When the user double clicks on the file we check if PowerShell is in the path and that it is v2 or greater. We abort if either of those conditions are false. Finally we execute the PowerShell script with paramaters to ensure it runs on a new system without having the execution policy set yet. If you exit your powershell script with a non-zero the batch file will remind the user to read carefully before the window closes.

Posted in General | Tagged , | Leave a comment